Setting up a Facebook Lead Generation ad
Login to Facebook Ads Manager

Under What’s your marketing objective select Lead generation

Give your Campaign Name a title

Give your Ad Set Name a title

Select which Facebook Page you would like you create your ad for. (Having a Facebook Page is a requirement for using Lead Generation on Facebook)
Now we need to setup our Audience if you already advertise using Facebook Ads and have Audiences all ready to go select your Saved Audience and skip to the next section

1. Enter one or more global regions, countries, states/regions, cities, postal codes, addresses or Designated Market Areas ® to show or exclude your ad to people in those locations. Location targeting is not available in all countries (You can Include Locations or Exclude Locations
2. Select the minimum and maximum age of the people who will find your ad relevant
3. Choose “All” unless you only want your ads to be shown to either men or women
4. Leave this blank unless the audience you are targeting uses a language that is not common to the location you have chosen above

5. Define your audience by including or excluding demographics, interests and behaviors
6. Reach people who have a specific kind of connection to your Page, app or event. This will narrow your audience to include only people with that specific connection who also meet the other targeting categories you’ve selected
7. Click the Save This Audience button
You now have an Audience setup remember to tweak this as you learn what works and doesn’t work over time.
Skip to here if you already have an Audience set up

Only 2 options here. You can let Facebook decide where your ads are show with Automatic Placements or you can decide where they are shown (FB, Instagram, Network) by selecting Edit Placements

1. Select your Budget. I always start new ads on a $5 daily budget. This allows me to slowly and cheaply test to make sure everything is working properly before gradually increasing my daily budget
2. Select how long you would like this Campaign to run
*Notice the highlighted area this will show weekly budget

1. Your bid amount determines how effectively Facebook can optimize your ad delivery. Your bid competes in an auction with other advertisers, who also want to reach the same target audience
2. You can schedule your ads for specific hours and days of the week
3. You can choose standard or accelerated delivery. Standard delivery is recommended and the preferred option for most advertisers. Accelerated delivery can be useful for promoting time-sensitive events and quickly reaching a target audience. Manual bid pricing is required for accelerated delivery.
4. Click Continue button

Give your Ad Name a title

If you don’t have an Instagram account connected to your business. The Facebook Page you’ve selected above will be used to represent your business on Instagram.

Select your ad format for this example I’m using a Single Image

You can add up to 6 images here. Most of my ads I test with a single image until I know it is working properly. You can use Facebook Free Stock Images or create your own. Facebook is very fussy with their image ads (they hate text on images). Minimal text is allowed as you can see from my ad.
*Should you create your own image please pay attention to the highlighted area above. My image is 600×315 minimum required to be used on Instagram. All ads I create on FB are 600×315.

*Notice where the Red callouts match the Green callouts. Red controls where Green shows up for example Red #1 Headline is where the Green #1 Headline text shows in the ad
1. Add a brief headline to let people know what your ad is about. This won’t appear in all placements.
2. Add some text that will encourage the end user to take action.
3. Add a button that matches the action you want people to take when they see your ad. Here I selected Signup but a better option would have been Download (this is why we set a $5 budget because it’s easy to make small errors, no worries I’ll fix it)
4. Add additional text to emphasize why people should visit your website. This won’t appear in all placements.
5. This is the URL that will be shown to people who see your ad. It can be a shortened or reformatted link, but it must direct to the same place as your destination URL. This won’t appear in all placements.

*Notice the highlight area clicking this will allow you to add advance options. I’m showing you this area because I use it but is not necessary to get started. Look at this as an advance feature, feel free to skip this if you’re not comfortable.
1. URL parameters you specify here will be appended to or replace existing parameters in URLs. For example, if the URL parameters are specified as key1=val1&key2=val2 and this ad includes the URL www.example.com?key1=test, then the URL will be updated to www.example.com?key1=val1&key2=val2
2. This will measure your website conversions. You’ll see your results in Ads Manager along with performance of your ads.
3. This will measure your offline conversions. You’ll see your results in Ads Manager along with performance of your ads.

Now we need to create our first form. Click New Form button
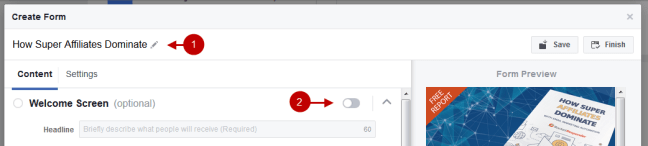
1. This step is VERY IMPORTANT once you hit save you cannot change the name of your form. Make sure you name your form. (Ask me how I know haha)
2. Welcome Screen is optional but I do not use it and here is my reason why. It makes for another step the end user has to take to complete the action. I’ve tried both and got similar results so I stick with my less is more philosophy here.

This is my favorite part as you can see all that is required is selecting the type of information you want to collect. Any box you check will add it to the form on the right. Here is the great thing about Facebook Lead Generation ads, all of the information is prefilled in all the end user has to do is hit Submit.
Feel free to play around with this section but for my needs all I want here is their email and name.

Facebook requires you to have a Privacy Policy. You can use your own if you have one or you are free to use ours here is the link to it https://www.rocketresponder.com/privacy
1. Link Text add the word Privacy Policy
2. Link URL add a link to the privacy policy

This is where the link to your Thank You page goes. Since I’m giving away a free guide I decided to link directly to the PDF file. However you can link to whatever page you want.

We are done creating our form. Let’s go ahead and click the Finish button at the top of the popup screen.

Make sure you have the form you just created selected (Facebook does this by default but it doesn’t hurt to double check) and click the Green Place Order button

Click the Blue Continue button and will be taken to where your ad now resides in your Facebook Ad Manager.

We are all done here time to move on to RocketResponder.
Linking your Facebook Lead Generate ad leads to your RocketResponder Followup Series
Login to your RocketResponder account

Click the new Facebook Funnel button in the left menu
Click the Login Facebook button above the video tutorial and will be presented with a popup box to link your account

Click the big blue Continue as You button

After connecting your Facebook account with RocketResponder you will see all the Facebook pages you are a manager of.
1. Default List is a catchall and isn’t required. As you can see under RocketResponder I set the catchall to a followup series called RocketResponder Facebook.
2. Manage Forms lets you set Followup Series to individual forms. click the blue View Forms button.

Each individual Facebook form for that Facebook Page will show. Here you can see I named my Facebook Lead Generation form “How Super Affiliate Dominate 1” for this form in the drop down I have select a followup series I’ve written called “Email Marketing for Affiliate Marketers”
That’s it nothing left to do congratulations!
Let me show you one more thing in Facebook Ad Manager

It’s been a few days since I setup my ad. You can see I’ve generated 10 leads at the cost of $3.24 this number goes down dramatically as I tweak my target Audience over time.
Don’t have a RocketResponder account?
That’s ok I’m going to give you 30 days to try this method completely free along with all the other tools in our software suite but that’s not all I’m going to do.. if you’re happy using RocketResponder it’s only $20/m no limitations unlike our competitors who increases their fees as you make more money. We never increase our rates once a customer locks it in. Even if our software goes up in price and features (which it does on a regular basis) you will always pay $20/m period!
Click Here to get RocketResponder FREE for 30 Days than only $20 a month after that. No contracts can cancel at anytime. Cancelling within the 30 day trial will not bill your account. Cancelling is super simple just a giant red button in your account area. No Games No Tricks. We truly care about our customers even if RocketResponder isn’t right for you.


